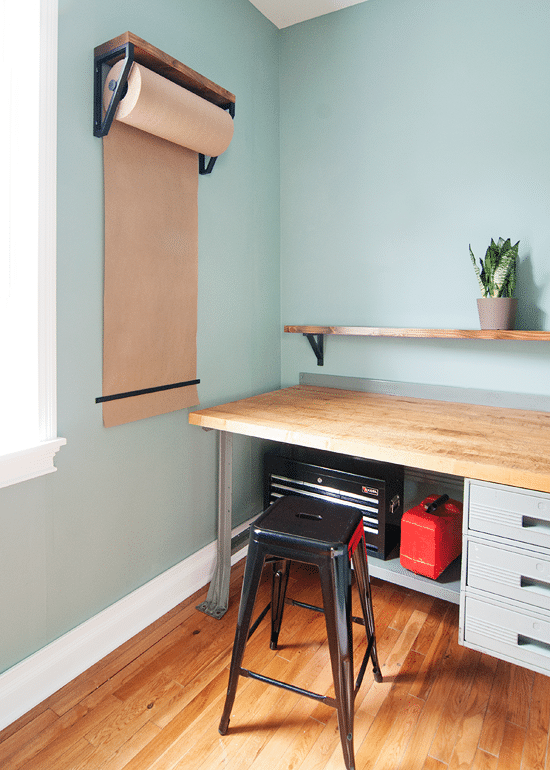
We’re all about the wall mount in this tiny workshop, apparently! I was completely inspired by this studio roller, and after running the idea past Scott – we can make this!, I said – he was on board and agreed it would be a simple enough DIY. It is a simple enough DIY, although we did run into one glitch – more on that in a minute. In our execution, we liked the idea of adding a shelf across the top for stashing a plant or leaning a photo – or for the extra tall (aka: anyone but me), it would be a landing spot for storing markers.
Before any weekend, we typically go through a list of home-related to-dos, often times drawing each other diagrams on scraps of paper to get our ideas across. These papers are tacked to the fridge so we can both stay on track while having the satisfaction of crossing items off, but now? We can keep these lists, notes and sketches in the workshop and use a big red marker to slash through the completes. Yea!

SUPPLIES USED FOR 20″ KRAFT ROLL
20″ kraft paper roll
2 – Ekby Lerberg IKEA shelf brackets
1 1/8″ dowel rod
2 – 1 1/2″ washers
3′ flat aluminum bar
Flat black spray paint
2″ x 10″ x 8′
Wood stain in Special Walnut
Polycrylic in satin
2 – 2″ nuts + bolts (not pictured above)
50 lb. anchors (not pictured above)
Drywall or wood screws (not pictured above)
TOOLS USED
Miter saw for cuts
Table saw for squared edges (see alternative in step-by-step)
Dremel w/ metal attachment
Drill + right angle adapter
Measuring tape
Orbital sander
Paint brush and/or rags for stain/poly
WHAT WE DID. We prepped all of our supplies by making cuts, drilling pilot holes and spray painting. In our supply list, you’ll notice that we used a 2″ x 10″ for the shelf, which might be overkill to replicate since it bears little to no weight. In our case, we pulled double duty and built that shelf along the wall above the workbench, squaring the edges on our table saw and ripping everything down to the right depth. For anyone else, a 1×8 piece of pine would work just as well, since you’ll want to have a 7.5″ depth once you’re done.
For a 20″ kraft paper roll, we cut our 2×10 to 23″ x 7.5″, the dowel rod to 23 1/8″ and the aluminum flat bar to 22″ (using the dremel). If you’re using a smaller or larger paper roll, you can add or subtract your measurements all the same! I then sprayed the brackets, dowel and washers with flat black spray paint.


We eyeballed the height and placement, keeping in mind that the writing area is below the bottom of the brackets! The unit was anchored into the wall, using a level to ensure everything lined up properly. A right angle drill adapter was used to anchor everything in place, but measuring everything beforehand and slipping it on would work too for a little extra effort. On a side note, we’ve been using and loving all in one anchors (50 lb.) to make the job even easier! Tip: The brackets needed leveled along the sides and a gentle nudge to make sure they were straight up and down. They flexed easily enough to make this happen.


With all the drilling and anchoring, you’re bound to have a few scuffs on your freshly painted brackets, so we touched those up using a cotton swab. I’ve shared this before, but I think it’s worth mentioning again; just spray the paint into the lid until you have a small pool to pull from!

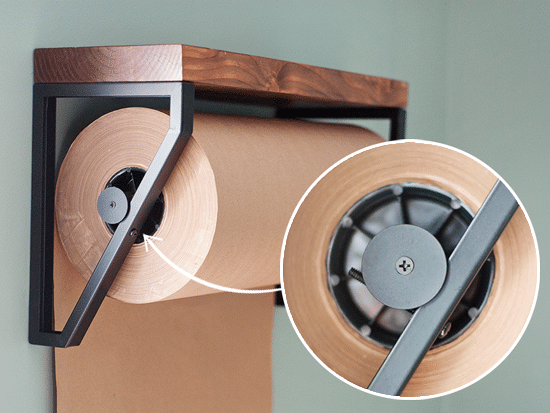
Now, here’s where things fall off track. The idea behind using these particular Ikea brackets was to build in a self-roll-down – meaning, as the paper roll gets thinner with use, it will naturally roll down the bracket and stay flush against the wall. Unfortunately, once we put the dowel rod + paper in place, the roll itself was too heavy, and the friction against the wall proved to be too much! It would. Not. Budge. We had discussed beforehand that this might happen, but I was stubborn and wanted to push through, so, lesson learned.


… and then we put the dowel and roll back in place, now resting on the 2″ bolt. It worked! It rolls! The dowel stays static (so there’s no paint rubbing or chipping), and the kraft paper is off the wall just enough that it spins with ease. From there, we used wood screws to secure the washers to the ends of the dowel rod.
While our solution gives the roll a fixed place, we still love the look and simplicity of the brackets. As the paper gets really thin down the road, we’ll likely have to install another aluminum bar under the base of the brackets, or if the paper gets light enough, we could move the dowel + paper under the bolts and roll with the original plan.
Finally, we used drywall screws to attach the aluminum bare towards the bottom of the paper – loose enough so that the paper doesn’t get stuck, but no loose that they feel flimsy. When we’re ready for a fresh sheet (and ready to kiss last week’s to-do buh-bye), the paper easily tears away!

Again, the leftover 2×10 was turned into a long shelf above the workbench using the Ekby Valter brackets. It’ll stay mostly empty as an additional space to spread out and, most importantly, be the space where we keep those jars of loose screws. We’ve got plenty of those. (Ha!)
Original article and pictures take www.yellowbrickhome.com site
Комментариев нет:
Отправить комментарий